Tuesday, October 30, 2012

Lesson 1: Parenting Vs. Parent Constraint


Lesson 1: Parenting Vs. Parent Constraint

Parenting:


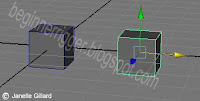
                Parenting is the most common function in Autodesk Maya that allows for one or more objects to follow another. When parenting, click the “child” or the object you want to follow and Shift select the “parent” or the object you want to lead then hit P. Now if you select the parent, it will always select the child. The child now follows the parent but its translation, rotation, and scale values do not change.

Steps to Parenting:

 Step 1: Make two or more objects. Go to the Create Tab à Polygon Primitives à whatever shape you want

Step 2: Hold the Shift button and select the child then the parent.

Step 3: Hit P.


Parent Constraint:


                A Parent Constraint differs from Parenting because Autodesk Maya creates a connection that actually affects the child object’s translation and rotation values, but the constraint does not influence the scale values at all. I refer to the parent object as the “driver” and the child object as the “driven.” A driven object can have more than one driver per connection, but you have to make multiple connections to have more than one driven per driver. The Parent Constraint gives you more control in other areas as well that will come in handy when you actually start setting up a rig, but this is a brief summary of how a Parent Constraint differs from a strait Parent.

Setting Up a Parent Constraint:
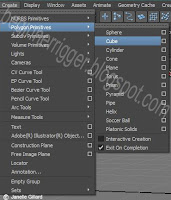
Step 1: Make two or more objects. Go to the Create Tab à Polygon Primitives à whatever shape you want 
                     

Step 2: Hold down the Shift button and select the driver then the driven.

Step 3: Go to the top, and make sure the Menu Bar setting is on Animation.

Step 4: Go to the Constraint Tab à Parent and the driven object should turn pink


*Look in the channel box; you will find the translation and rotation values for the driven object to be blue. Any time you see channel boxes highlighted with a color, it means that the object is being controlled by an other source. Sometimes the highlighted values cannot be changed, but others, like this parent constraint, will still allow you to change the driven object without affecting the constraint's effect.*


Reference

(2012).Maya's User's Guide: Create a Parent Constraint.http://download.autodesk.com/global/docs/maya2013/en_us/index.html?url=files/CSCo_Parent_constraint_workflow.htm,topicNumber=d30e296266
Slick, Justin.Maya Training Series1.3 Object Creation.N.D.http://3d.about.com/od/Creating-3D-The-CG-Pipeline/ss/Maya-Lesson-1-3-Object-Creation.htm

Friday, October 26, 2012

Getting Used to Autodesk Maya 2013 Part 2

Getting Used to Autodesk Maya 2013 Part 2

Autodesk Maya's Tools
      I will be discussing the different areas to find tools as well as a few tools. You will not use all of the tools that Autodesk Maya has to offer. You need to know where to find tools because not all of the tools are present when you start Autodesk Maya.

The Menu Bar and Status Bar

·         Both the Menu Bar and  the Status Bar tell you what setting that you have applied to your scene or the file you have open. The settings refer to which set of tools that you are looking for. There are too many to display at start.
      Some of the tabs on the Menu Bar can change depending on what setting you have Maya:
o   Animation: Tools for joints and deformers for making the model move and change in more believeable ways
o   Polygons: Tools for modeling object
o   Surfaces:  Tools to fine tune surfaces
o   Dynamics: Tools for special effects such as fire
o   Rendering: Tools for lighting and texturing
o   nDynamics: Tools for more complex special effects
·         The Status Bar tells you which mode you are selecting (this can also be accessed by right clicking in the workspace) or how you move the selected objects or components such as snapping to the grid. Both the Menu Bar and the Status Bar have the standard save, open, and new scene options, but the Status Bar has it represent graphically while the Menu Bar has it in the "File" drop down menu.

The Toolbox
           The Toolbox is on the left side of the workspace and contains some of the common tools needed and the very last box will show the last tool used.
       Here are the tools listed from top to bottom:
o   Selection Tool (use the Q button as a hotkey): The most basic way of selecting objects and components. It looks just like a normal cursor.
o   Lasso Tool: This selection tool looks like a lasso and will make a selection based on an area that you draw over.
o   Paint Selection Tool: Selects by using a brush directly on the object to select components. The brush radius can be changed by holding down B and moving the cursor while holding down the left mouse button.
o   Move Tool (use the W button as a hotkey): Translates objects or components on three axes and is graphically represented by 3 colored arrows that correspond with the axes found at the bottom of the workspace. The middle box will move the object in all three axes at the same time.
o   Rotate Tool (use the E button as a hotkey): Rotates objects or components on the three axes and is graphically represented with 3 circular handles corresponding with the axes found at the bottom of the workspace. The bigger handle around the three colored ones to rotates the object around all three at the same time.
o   Scale Tool (use the R button as a hotkey): Changes objects or components on the three axes and has boxes for handles that correspond with the three axes found at the bottom of the workspace. The middle box will make a uniform scale.
o   Universal Manipulator: Puts the Move Tool, Rotate Tool, and Scale Tool in one tool.
o   Soft Modification Tool: Lets you smoothly, uniformly modify a group of vertices (or points) on a mesh or object.
o   Show Manipulator Tool: Shows the hidden parts of certain objects like lights.

Thursday, October 25, 2012

Getting Used to Autodesk Maya 2013 Part 1


Getting Used to Autodesk Maya 2013 Part 1

The Window at a Glance
                The Autodesk Maya 2013 interface can at times be intimidating, but I will be taking it apart into easier understand pieces. These are the basic features that you need to know in order to continue. More parts will be introduced to you as the blog progresses.


The Workspace
          The workspace is the center window where you will spend the most time working. Your objects are visible in the workspace and can be manipulated in 4 panels:
   

  • Perspective (3D representation of an object)
  • Front (2D representation of an object)
  •   Side (2D representation of an object)
  •  Top (2D representation of an object)
         These panels can be toggled or switched by using the
space bar and hovering your cursor over the panel you want. To change from wireframe (just lines) to shaded (having color) switch between button 4 for wireframe and button 6 for shaded on your keyboard, and to change from smooth to normal or more straight edged, use button 1 for normal and button 3 for smooth on your keyboard.


The Channel Box
·         The Channel Box says the name of the object as well as displays the translate, rotate, and scale values of that object. You can change the name of the object from here or any of the values seen. The Channel Box gives you information like the shape node's name and history or past actions in the "INPUTS" area towards the bottom of the Channel Box.

*A node is a part of any object. Autodesk Maya automatically makes
three nodes per object: one for the dimensions, one shape node,
and one node for shading. You will not mess with these for some
time, but they are nice to know.*

Wednesday, October 17, 2012

Introduction to Beginner Rigger


Introduction to Beginner Rigger

I am a student currently studying rigging and animation at the University of Texas at Dallas. I have already taken a 3D modeling class in Autodesk Maya, and now I am taking a rigging class, so I understand the program quite well. These classes have taught me how to deal with some of Autodesk Maya’s quirks and advantages.              

The purpose of Beginner Rigger is to teach you, the reader, basic principles of rigging. These principles will be taught using Autodesk Maya 2013 because it is considered industry standard. This blog discusses the basic operations of Autodesk Maya 2013 for the new user, and if you do not already have Autodesk Maya 2013, then please check out the Autodesk Education Community . The community allows for students and educators to get Autodesk software for free with a license lasting about three years. It is easy to sign up for an account. All you have to do is give them your email and what school you are currently going and what year you are graduating.

               Rigging is the process of giving the computer model the ability to move and controls for the model. Rigging takes a more technical look at things, so most people tend to gravitate toward the more aesthetically pleasing jobs such as modeling, lighting, texturing, and other similar areas. Since many try to avoid rigging, more jobs are available for those who willingly specialize in this area. Learning rigging helps in other areas as well. If you want to animate, then you might want to learn because it teaches you to the concepts to alter an existing rig to your preferences. Once you learn the basics, the process becomes natural and much more enjoyable.